Mommy Pehpot

Top Mommy Blogger Philippines- Super Mommy; Award Winning Mommy Blogger

  • Home
  • About Me
  • Work With Me
  • Daily Vlog
  • Disclosure
  • Events

Elmer’s Grand Slime Time Fair 2018

I have been hearing slime for years now but it was only this year that I finally gave in. For one, akala ko kase hindi sya kid friendly, I just can’t imagine my kids using detergent as part of their play. Also, borax is hard to find.. eh you dont need those pala. There are slime recipes that does not need borax and detergent. And you can even add ingredients to make your slime look better (and feel better too!) That’s what we learned from Elmer’s Grand Slime Time Fair 2018! We learned how to make a crunchy slime!

Other participants learned how to make galaxy slime,  glow in the dark slime, rainbow slime, frosty slime, unicorn slime, jelly slime, and even sand slime. We also got the chance to see Elmer’s glue products that are perfect for every slime recipes. Watch our VLOG below:


VLOG: Elmer’s Grand Slime Time Fair 2018

The Elmer’s Grand Slime Time Fair 2018 was held at Eastwood Mall last December 1 and 2. The workshop is FREE and the participants only need to buy their ingredients, in our case, we just bought some glue to make a crunchy slime. The crunch was provided, may nag a assist din sa younger kids. Marius really had fun making his own slime 🙂

During the event, audition for Elmer’s Slime Squad was also held. Kids made their own slime and expert videographers from Elmer’s shoot their video. A copy was given to the parents so they can upload to Elmer’s Slime Squad website.

How to join Elmer’s Slime Squad

  1. Make a video creating your slime using any Elmer’s Glue products:
    • Elmer’s Glue All (130g bottle and up)
    • Elmer’s Glitter Glue Gel (177mL any color)
    • Elmer’s Clear Glue (5oz)
    • Elmer’s School Glue (118mL)
  2. Video should not be more than 5 minutes and not more than 50 MB.
  3. Upload your entry to  www.elmerslimesquad.com

Elmer’s Slime Squad contest is Open to kids ages 6 to 12 years old. For the complete rules, pakibasa mabuti ito mga momshies: Elmers Slime Squad Contest Rules 

Grand prize is 100,000 Pesos!!!

Basic Slime Recipe

Before you can make any of those slimes mentioned and plan to join the Slime Squad contest, you need to know the basic slime recipe. The ingredients are Elmer’s Glue, baking soda, lotion, shaving cream, and contact lens solution. Here’s the step by step guide:

  1. Pour all content of Elmer’s glue in a mixing bowl
  2. Add 1 teaspoon baking soda, then mix
  3. Add 1/2 tablespoon lotion (or 1 pump if you’re using a lotion with pump) then mix
  4. Add shaving cream, 1 tablespoon (or big one pump), then mix
  5. Add the activator which is the contact lens solution. Add 1 tables spoon at a time. Add more to reach a thick consistency.
  6. Get the slime and start kneading.. squeeze, shape, mold, and repeat.

That last part is super fun. Nakakawala sya ng stress promise!

And if you want a colorful slime, you don’t need to add colors, just use Elmer’s Washable Color Glue. If you want a slime with glitters, just use Elmer’s Classic Glitter Glue. But my most favorite part is Elmer’s Glow in the dark glue. You can never go wrong with Glow in the darks.

All this Elmer’s Glue products are available at National Bookstore. Other Elmer’s products that you can buy at National Bookstore are Elmer’s Slime Starter Kit, Elmer’s Frosty Slime Kit, and Slime Time accessories.

Watch out for the next Grand Slime Time Fair event, follow Elmer’s Glue Facebook Page for updates.

Leave a Comment Filed Under: Arts and Crafts, KIDS

Spice Up Your Artsy Life With Your Kids


You know how much I love spending time with my kids. One of our favorite activities is doing arts and crafts. Our friends from Pepper Manila suggested stamping and provided us with some stamping ideas and stamping tools: 

Stamping is the process of making designs on paper (or another medium) by pressing an inked, raised surface on it. We use it all the time when marking documents (“RECEIVED”) or as an easy way to get our signature on something. But stamps are decorative, too. Grade school teachers have stars and “Very Good” stamps on hand all the time to encourage students.

These rollers make stamping statements on your letters and postcards even easier. PhP 100.

Stamping is something that you and your kids are overly familiar with. So why not turn it into a fun activity that is both entertaining and educational? It is an easy yet ultimately fun activity for families who wish to spend their time together without spending much.

Stamping ideas
Get a sheet of kraft paper and have the kids stamp repeating patterns. You won’t only be making personalized wrapping paper, you’ll also be teaching them order and repetition (or at least proper spacing).Or using individual letter stamps, have them spell out their names and make their own name stamps. Use it to mark their books and other school stuff.


You can also do a creative stamp challenge. Place all your stamps in a box and have the kids draw five pieces each. The challenge is to come up with a creative design based on a chosen topic (robots, Disney characters) using only those stamps.

Cost-effective hobby
Stamping yields different end-products that you and your kids will surely love. So bring out your notebooks, fabric wallets, wooden magnets, and start stamping designs on them to personalize your favorite stuff.
Stamping doesn’t only give you a unique opportunity to bond with your kids but also provides an avenue to nurture their artistry and unleash their creativity. They will be challenged to think of ways to add color and design to usual stuff, making them learn to blend colors, mix and match shapes and appreciate even the smallest details.

These 1.5 inch heart stamps with floral patterns add a decorative touch to any note or scrapbook page. PhP 90 for a set of 4.

This hobby need not be expensive. Sure you need to buy stamps and ink and paper supplies, but (1) you’ll be making stuff that you can actually use (if you do it right) and (2) they’re really not that expensive. Craft shops and online stores like peppermanila.com offer inexpensive hobby supplies that won’t cost you your kids’ tuition. Fifteen pesos gets you a pattern stamp that you could use to turn a simple fabric to a nice placemat. Or you can splurge and get a few hundred pesos worth of letter and roller stamps.

It’ll take all your willpower not to buy them all. But keep in mind: this is for the kids.

1 Comment Filed Under: Arts and Crafts, KIDS

Sati’s New Play Clothes: Tie Dyed Shirt with Heart Design

If you have noticed, my boys only wear white sando as their pambahay..it has been that way ever since. And we only buy one kind of sando (Loving Couple sando)..when Sati arrived, most of her clothes were printed house dress or house blouse. Recently, she’s developing a certain likeness to Chico’s sando and insist on wearing it from time to time.. it must be the cooling effect of cotton sando.. but oh boy! she looks like a boy wearing a boy sando!

It’s so hard to say no to this girl.. so I take out my creativity once again, bought a few boy sando, dyed it and sew to make a razor girl sando.. teehee

That’s the finished product.. 10 new sando fro my little girl! to make it a bit more girly, here’s what I did:

I sewed a garter on each side of the sando (leaving at least one inch from top and from the bottom) then sewed the back to give the a more defined razor back effect, and here it is:

Tie dying is one of my favorite thing to do.. when I was in high school, I used to tie dye my old shirt, but I only knew one design, the simplest tie dye design.. circle tie dye. When I had my first born, I learned how to make spiral design with 3 colors and tie dyed some of their clothes with spiral design in red, green and yellow! (reggae yeah!)

Here’s how to to create a spiral design for tie dye:

  • Take the center of the clothes and start twisting it to form a circle
  • Tie the clothe and make sure it is tight.
  • Divide the clothes into 3, then pour dye in each part.
  • Do it on the other side then rinse with water.

For this project, I used blue, green and red.. not a good color combination haha

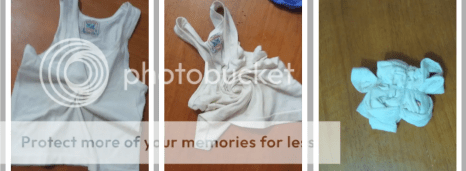
For Sati’s play clothes, I had to look for other designs and so far, the easiest was the heart design:

Here’s how to tie dye with a heart design:

  • Using a white shirt, flat it out then take the center of the front of the shirt.
  • Fold the center then draw a half heart, mark it heavily
  • Fold the heart design and make sure that your marking forms a straight line when folded.
  • Tie the folded shirt, to the part where the markings are

  • to make a two tone tie dyed shirt, dip the smaller area to the desired color, as it is with the photo above, the heart design submerged into red dye. After that, dip the bigger part to the other color. You can also use one color for this design (like the violet sando above)

Here’s the finished product:

MY little girl love her new sets of play clothes so much!

9 Comments Filed Under: Arts and Crafts, KIDS

Mommy Blogger Pehpot

Search

Popular Posts

  • Meat-Free Recipes For Holy Week
    Meat-Free Recipes For Holy Week

Recent Posts

  • Meat-Free Recipes For Holy Week
  • Harry Potter Concert Manila
  • Baguio House with Kitchen For Rent
  • Modern Swimming Pool- Trending Pool
  • Quality Toy Cabinet For Storage
  • Cheesy Chicken Katsu Curry
  • Best Asian Mom Blogs 2025
  • UNIQLO 2025 Spring/Summer LifeWear Collection
  • Uniqlo Logo Store Philippines Shopping
  • Top Filipino Mom Influencers in 2025

Home and Living

Baguio House with Kitchen For Rent

Cheesy Chicken Katsu Curry

Pinoy Christmas Potluck Food Idea: Sandwich

Blog Buzz & Media Updates

Meat-Free Recipes For Holy Week

Harry Potter Concert Manila

UNIQLO 2025 Spring/Summer LifeWear Collection

Get more mommy stories and parenting tips straight to your inbox:

Useful Links

  • Kids
  • Home & Living
  • Parenting
  • Personally Pehpot

PSA Birth Certificate Delivery Service

PSA Birth Certificate Delivery Service

SEARCH MY WEBSITE

· Copyright © 2025. Site brewed with love by Squeesome Design Studio ·